ApplescriptとRubyでもう僕は移動しない
忙しい社会では無駄な労力というのはとても嫌われます そしてコンピュータネットワークの発達した現代では 「移動」は無駄な労力の1つとみなされています
ネット世界の住人は特に移動を嫌います 物を買うにも友と語らうにも移動を避けます 移動は無駄に時間を消費するからです そう現代ではマウスクリック1つで問題は解決するのです
ところが彼らの中にはそれでは満足できない一群がいました 彼らは言うのです 「マウスに腕を伸ばすのも時間の無駄である」 極論ですが一理あります 確かにマウスの使用は腕の移動を伴います
そんなわけでGUIに完全に制圧されたこの世界でも キーボードだけで何とか事を解決しようと試みる人たちはいます
彼らはQuickSilverでアプリを立上げ VimやEmacsでエディットし Vimperatorでブラウズし livedoorReaderでブログを読み Termtterでツウィットし SizzlingKeysでiTunesをコントロールし ⌘+tabやWitchでアプリを切換え SpacesやVirtueDesktopsでウィンドウを切換え KeyRemap4MacBookでkeybindingを変更し そして最後にQuickSilverでshuとタイプして一日を終えるのです
しかし彼らにも一日に何度か マウスを使わざるを得ない場面というのがやってきます 例えばそれはコンピュータで 「見ながら書く」という行動を取るときです ネット上の解説を参考にTerminalでコマンドを打ったり PDFに載っているサンプルコードをVimに写したりするとき 2つのウィンドウをそれらが重ならないようにするには マウスを使わざるを得ません1 堪え難い屈辱的瞬間です
しかし簡単に諦めるわけにはいけません 何しろ移動は時間の無駄なのですから
幸いMacVimやTerminalには奥の手があります そうウィンドウの透過です これらのウィンドウにはtransparencyという そのbackgroundの透過度を調整する設定があります これを使えばウィンドウの向こう側を「透かし見る」ことができるので マウスを使ってウィンドウを動かす必要はなくなります
しかし一方でジレンマがあります この透過度を上げ過ぎると普段ウィンドウの向こう側が目障りになり 下げ過ぎると向こう側の文字が良く読めません うまくいかないものです
よい方法はないのでしょうか
それがあるのです そう透過度をkeyboardで調整できるようにすればいいのです! これなら万事がうまくいくに違いありません
以下はMacVim, iTerm, Terminalにおいて keyboardでそれらの透過度を調整するため 自分が取った試行錯誤を紹介します 不完全ですが一応の成果は得られたので公開します
MacVim
Vimにはtransparencyという設定項目があり それを:set transparency=で変更できます ですから単に以下を.gvimrcに記述すればいいです
nmap + :set transparency+=5<CR>
nmap _ :set transparency-=5<CR>
この設定でnomal modeで+を押す度に透過度が上がり _を押す度に透過度が下がるようになります やはりVimはただ者ではありません
iTerm
*Applescriptその1
iTermはApplescriptをサポートしています ですからその透過度をApplescriptを使って変更できそうです 問題は未経験の自分がそれをサポートできるかです…
幸いiTermのサイトにsampleがありました これを参考にコードを書いてみました (そう、まさにこういうときのために透過させたいのです!)
tell application "iTerm"
    activate
    tell current session of current terminal
      	set transparency to "0.3"
    end tell
end tell
このscriptはiTermをactivateし 現在のterminalの現在のsessionの透過度を0.3にします これを例えばtransparency_to03.scptとして保存します
iTermで以下のようにすれば動作が確認できます
% osascript transparency_to03.scpt同様に元に戻すためのtransparency_to005.scptを用意します
tell application "iTerm"
    activate
    tell current session of current terminal
      	set transparency to "0.05"
    end tell
end tell
*scriptのメニュー登録とkeyboard shortcutの割り当て
次にこれらのscriptをkeyboard shortcutで呼び出せるようにします 1つの方法はiTermのスクリプトメニューにscriptを登録し それにshortcutを割り当てる方法です
スクリプトメニューはそのapplicationの専用フォルダに scriptを置くことで出現します2
% mv transparency_to03.scpt transparency_to005.scpt ~/Library/Application Support/iterm/Scripts/次にシステム環境設定>キーボードとマウス>キーボードショートカットを開き +ボタンを押してショートカットの登録ダイアログを開きます アプリケーション、メニュータイトル、ショートカットを設定します
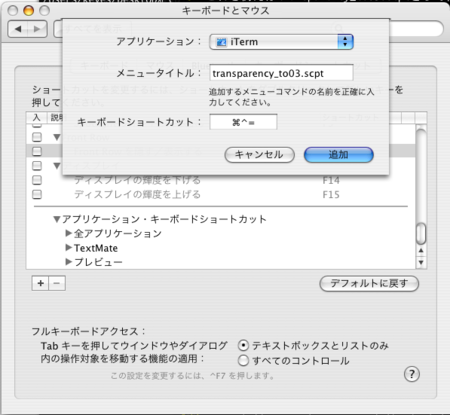
同様にしてtransparency_to005.scptを登録します これによって登録したショートカットで iTermの透過度を変えることができるようになります
*Applescriptその2
それにしても固定値のscriptを2つというのは酷過ぎます これじゃ単なるマクロです Applescript未経験とはいえ 自由に値くらい変えられるようにしたいものです
調査の結果runハンドラというのを使えば scriptに引数を渡せることがわかりました scriptは以下のようになります
on run argv
  tell application "iTerm"
      activate
      tell current session of the last terminal
          set transparency to item 1 of argv
      end tell
  end tell
end run
引数群をargvで受けその最初のものをtransparencyに渡します
% osascript transparency.scpt '0.4'ところがこれをkeyboard shortcutに登録する方法が見当たりません
悩んだ揚げ句shell commandを呼ぶApplescriptを書いて これを登録する方法を考えました do shell scriptはApplescript内でshell commandを実行します
transparency_to03.scpt
do shell script "osascript ~/Library/Application Support/iterm/Scripts/transparency.scpt 0.3'"transparency_to005.scpt
do shell script "osascript ~/Library/Application Support/iterm/Scripts/transparency.scpt '0.05'"しかしどういうわけか自分のTiger環境では これらを先のapplicationのフォルダに置いて実行すると ハングしてうまくいきませんでした
AppleScriptユーティリティ
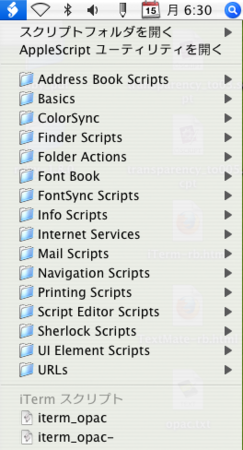
Applescriptの別の置き場所としては メニューバーのスクリプトアイコンで表示されるエリアがあります このアイコンを出現させるには Application>ApplescriptにあるAppleScriptユーティリティを開いて メニューバーにスクリプトメニューを表示するをチェックします
iTermをactiveにした状態でアイコンをクリックし スクリプトフォルダを開く>iTermスクリプトフォルダを開くを選んで 開かれたフォルダにscriptを置けば このメニューからscriptを起動できるようになります ちなみにこのフォルダは ~/library/Scripts/Applications/iTerm/になります

ここでは先のscriptは正常に動作しました しかしこのフォルダ内のscriptに keyboard shortcutを割り当てる方法は 残念ながら見つかりませんでした
QuickSilverを使う
こうなるとQuickSilverの出番です QuickSilverで目的のscriptをrunする という方法もありますが QuickSilverにはTriggersという機能があって これを使えば任意のactionに keyboard shortcutを割り当てることができます
⌘+’でPreferenceのTriggersを開き 1. >Hotkeyと辿ってscriptを追加するダイアログを開きます script名を打ってitemに設定しtriggerをダブルクリックして keyboard shortcutを登録します これで無事目的を達成できました
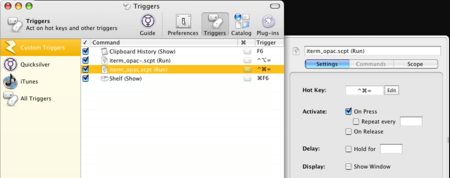
ただ問題が1つあってQuickSilverを使うと shortcutがiTerm専用ではなくグローバルになってしまいます そのため同じような透過設定を複数のアプリケーション 例えばiTermとTerminalで実現する場合には これらには別のshortcutを割り当てる必要があります 現時点で解決方法は見つかっていません ご存知の方は是非ともコメントを下さい
Rubyを使う
Applescriptでは2つの設定を切換えるscriptを書きましたが できればMacVimでしたように キーを押す度に透過度が段階的に変わるものがほしいです Applescriptでこれを実現するのは難しいことではないでしょう でも自分はこれ以上Applescriptに時間を割きたくはありません…
そう何をするにもRubyを使いたいのです!
幸いRubyにはrb-appscriptというライブラリがあります これはAppleEventをブリッジして macなアプリをrubyから制御できるようにします
gem install rb-appscriptして 早々irbで試してみます
% irb -rappscript
irb> include Appscript
  => Object
irb> itunes = app "iTunes"
  => app"/Applications/iTunes.app"
irb> itunes.current_track.name.get
  => "I'd Like To"
irb> itunes.current_track.artist.get
  => "Corinne Bailey Rae"
最後のgetというのがアレですがrubyしてます
それではrubyでiTermの透過度調整コードを書いてみます iterm_opac.rb
#!/usr/bin/env ruby -Ku
# -*- encoding: utf-8 -*-
require "appscript"
begin
  iterm_opac = Appscript::app('iTerm').current_terminal.current_session.transparency
  interval = 0.3
  op = ARGV[0] == '-' ? :- : :+

  iterm_opac.set(iterm_opac.get.to_f.send(op, interval))
rescue => e
  require 'g'
  g e
end
scriptに渡される引数が’-‘か否かで getした現在値にintervalを減算または加算されるようにします そして新たな値をsetします
これをapplescriptで呼べるようにしましょう
iterm_opac.scpt
do shell script "ruby ~/path/to/file/iterm_opac.rb"iterm_opac-.scpt
do shell script "ruby ~/path/to/file/iterm_opac.rb -"そして先ほどと同様にQuickSilverで keyboard shortcutを登録すれば完了です
Terminal用Ruby Script
Terminalでも透過度を調整できるように rubyのコードを書きました
#!/usr/bin/env ruby -Ku
# -*- encoding: utf-8 -*-
require "appscript"
begin
  term_color = Appscript::app('Terminal').windows.get.
                  detect { |w| w.frontmost.get == true }.background_color

  interval = 10000
  op = ARGV[0] == '-' ? :- : :+
  r, g, b, opac = term_color.get
  term_color.set([r, g, b, opac.send(op, -interval)])
rescue => e
  require 'g'
  g e
end
基本はiTermのものと同じですが 対象のwindowとその透過度を取得するやり方が違います
ASDictionary
ネットには思いの外rb-appscriptに関する情報がありません そのため対象Macアプリで使える commandとpropertyを見つけるのに苦労します 以下のサイトは数少ない情報源の1つです
Scripting the Leopard Terminal
しかしASDictionaryというツールがあるのでなんとかなります
このツールはMacアプリ毎のcommandやpropertyなどを plain textまたはhtmlのかたちで出力できます しかしより有用なのはこのツールをインストールすると rb-appscriptはこの辞書に基づいたhelpシステムを構築するのです
rb-appscript manual | 4. Getting Help
見てみましょう
% irb -rappscript
irb> term = Appscript.app "Terminal"
  => app"/Applications/Utilities/Terminal.app"
irb> term.help '-h'
==============================================================================
Help (-h)
Help Manual
Syntax:
    reference.help(flags)
The optional flags argument is a string containing one or more of the following:
    -h -- show this help
    -o -- overview of all suites, classes and commands
    -k -- list all built-in keywords (type names)
    -u [suite-name] -- summary of named suite or all suites
    -t [class-or-command-name] -- terminology for named class/command or current reference/command
    -i [class-name] -- inheritance tree for named class or all classes
    -r [class-name] -- one-to-one and one-to-many relationships for named class or current reference
    -s [property-or-element-name] -- values of properties and elements of object(s) currently referenced
    Values shown in brackets are optional.
(略)
For example, to print an overview of TextEdit, a description of its make command and the inheritance tree for its document class:
    app('TextEdit.app').help('-o -t make -i document')
==============================================================================irb> term.help '-t'
==============================================================================
Help (-t)
------------------------------------------------------------------------------
Description of reference
Terminology for application class
Class: application -- The Terminal program
Plural:
applications
See also:
Standard Suite
Inherits from:
item (in Standard Suite)
Properties:
class_ (r/o) : type_class -- The class of the object.
frontmost (r/o) : boolean -- Is this the frontmost (active) application?
name (r/o) : unicode_text -- The name of the application.
version (r/o) : unicode_text -- The version of the application.
properties_ : anything -- every property of the Terminal program
Elements:
documents -- by name, index, relative, range, test
windows -- by name, index, relative, range, test, id
==============================================================================これでTerminalにはwindowsというElementがあり 個々のwindowにはnameやindexでアクセスできることがわかります そしてwindowがどのようなpropertyを持っているか調べるには 次のようにします
irb> term.windows[0].help '-t'
==============================================================================
Help (-t)
Reference: app("/Applications/Utilities/Terminal.app").windows[0]
------------------------------------------------------------------------------
Description of reference
Element: windows -- by name, index, relative, range, test, id
Terminology for window class
Class: window -- A Terminal window
  Plural:
    windows
  See also:
    Standard Suite
  Inherits from:
    item (in Standard Suite)
  Properties:
    class_ (r/o) : type_class -- The class of the object.
    closeable (r/o) : boolean -- Whether the window has a close box.
    document (r/o) : document -- The document whose contents are being displayed in the window.
    floating (r/o) : boolean -- Whether the window floats.
    id_ (r/o) : integer -- The unique identifier of the window.
    index : integer -- The index of the window, ordered front to back.
    miniaturizable (r/o) : boolean -- Whether the window can be miniaturized.
    miniaturized : boolean -- Whether the window is currently miniaturized.
    modal (r/o) : boolean -- Whether the window is the application's current modal window.
    name : unicode_text -- The full title of the window.
    resizable (r/o) : boolean -- Whether the window can be resized.
    titled (r/o) : boolean -- Whether the window has a title bar.
    visible : boolean -- Whether the window is currently visible.
    zoomable (r/o) : boolean -- Whether the window can be zoomed.
    zoomed : boolean -- Whether the window is currently zoomed.
    background_color : anything -- the background color for the window
    bold_text_color : anything -- the bold text color for the window
    bounds : anything -- the boundary rectangle for the window, relative to the upper left corner of the screen
    busy (r/o) : boolean -- Is the window busy running a process?
    contents (r/o) : unicode_text -- the currently visible contents of the window
    cursor_color : anything -- the cursor color for the window
    custom_title : unicode_text -- the custom title for the window
    frame : anything -- the origin and size of the window
    frontmost : boolean -- Is the window in front of the other Terminal windows?
    history (r/o) : unicode_text -- the contents of the entire scrolling buffer of the window
    normal_text_color : anything -- the normal text color for the window
    number_of_columns : integer -- the number of columns in the window
    number_of_rows : integer -- the number of rows in the window
    origin : anything -- the lower left coordinates of the window, relative to the lower left corner of the screen
    position : anything -- the upper left coordinates of the window, relative to the upper left corner of the screen
    processes (r/o) : unicode_text -- a list of the currently running processes
    properties_ : anything -- every property of the window
    size : anything -- the width and height of the window
    title_displays_custom_title : boolean -- Does the title for the window contain a custom title?
    title_displays_device_name : boolean -- Does the title for the window contain the device name?
    title_displays_file_name : boolean -- Does the title for the window contain the file name?
    title_displays_shell_path : boolean -- Does the title for the window contain the shell path?
    title_displays_window_size : boolean -- Does the title for the window contain the window size?
==============================================================================
=> app"/Applications/Utilities/Terminal.app"windows[0]
これで個々のwindowはbackground_colorという propertyを持っていることがわかりました
そしてこの値を取得するには以下のようにします
irb> term.windows[0].background_color.get
=> [0, 0, 0, -4718]
値を変更するには以下のようにします
irb> term.windows[0].background_color.set([0,0,0,-6718])
=> nil
ASTranslate
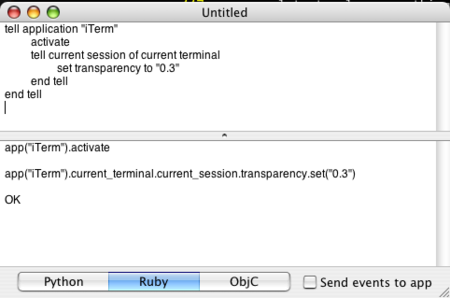
もしrubyよりもAppscriptに明るいのなら ASTranslateが便利です
rb-appscript manual | 4. Getting Help
Applescriptを上のペインに貼り付け ⌘+rすれば対応するruby scriptができてしまいます
説明がずいぶんと冗長になってしまいました より良い方法をご存知ならコメント頂ければ助かります
blog comments powered by Disqus