IRB それはRubyistの魔法のランプ
IRB 名前を聞けば誰でもわかる
超有名なライブラリ
IRBを知らなけりゃ それはもぐりのRubyist

:$
IRB 全部のRubyに付いてくる
あなたとRubyの対話の窓口
できないことがあるのなら irbと打ってみよう
rubyと打ってもダメですよ

IRB それはRubyistの魔法のランプ
こすれば何かが現れる
IRB それはRubyistの魔法のランプ
こすって願いを叶えよう
I RuB you I RuB you
:TO

IRB 色気がないのはご愛嬌
色がいるなら .irbrcしてください
補完だってインデントだって
そうしたいならプロンプトだって
あなた色に染まります

IRB それでも不満があるのなら
wirble fancy_irbが色付けします
デバッグするならpp ap y g -d
table viewにq o c
エディタいるならie sketches使ってね
コマンド足すならbosonあるよ
全部入りならirbtools!

IRB それはRubyistの魔法のランプ
こすれば何かが現れる
IRB それはRubyistの魔法のランプ
こすって願いを叶えよう
I RuB you I RuB you

君がいなけりゃ生きてはいけない
君がいなけりゃRubyも要らない
君がいなけりゃ
プログラミングなんてもうやらない
ごめんなさい いままでおざなりにして
これからはもっと君のこと大切にします

:D.S.

:CODA
IRB それは
アイルランド共和同盟(Irish republican brotherhood)じゃない
IRB それは
国際ラグビー評議会(International Rugby Board)でもない
IRB もちろん
治験審査委員会(Institutional Review Board)でもない

IRB そう
それは Interactive Rubyのこと
そう それはRubyistの魔法のランプ
さて…
irbとその周辺のことを少し調べたので、ここにまとめておきます。
irbの簡単な使い方
ターミナル上でirbと打って、現れたプロンプトでRubyのコードを入力します。
%irb
 irb(main):001:0> puts "hello, irb!"
 hello, irb!
 => nil
リターンで式の評価が行われ、結果が返されます。
複数行に渡る入力も受け付けます。
irb(main):004:0> def fib n
 irb(main):005:1> [0,1].include?(n) ? n : fib(n-1) + fib(n-2)
 irb(main):006:1> end
 => nil
 irb(main):007:0> fib 10
 => 55
つまりリターン入力時に式が完了していない場合、評価を先送りして 完了した時結果を返します。
_(アンダースコア)は前の評価結果を保持します。
irb(main):008:0> 1 + 2
 => 3
 irb(main):009:0> _ * 3
 => 9
 irb(main):010:0> _ / 2.0
 => 4.5
mオプションを付ければ高度な数学電卓になります。つまりmathnをrequireします。
% irb -m
 >> 1/2
 => (1/2)
 >> Complex(0, -1)
 => (0-1i)
 >> Prime.each(100) do |pr|
 >* print pr, " "
 >> end
 2 3 5 7 11 13 17 19 23 29 31 37 41 43 47 53 59 61 67 71 73 79 83 89 97 => nil
rオプションでライブラリを読み込みます。
% irb -ropen-uri
 >> site = open "http://www.nintendo.co.jp"
 => #<StringIO:0x76e0a8>
 >> site.read.scan(/<a href.*?>/)
 => ["<a href="n00/index.html">", "<a href="schedule/index.html">", "<a href="wii/index.html">", "<a href="ds/index.html">", "<a href="n09/index.html">", "<a href="n10/index.html">", "<a href="corporate/index.html">", "<a href="wii/index.html" class="wiiLink">"...]
DBインタフェース
データベースファイルを読み込めば、DBインタフェースになります。DBを定義したuser.rbにconsoleファイルでアクセスする例を示します。
user.rbを作ります。
require "dm-core"
 require "dm-migrations"
 DataMapper.setup(:default, "sqlite3://#{Dir.pwd}/user.db")

 class User
   include DataMapper::Resource
   property :id, Serial
   property :nickname, String
   property :email, String
 end

 DataMapper.auto_upgrade!
consoleファイルを作ります。
irb -r/path/to/the/user実行権限を付与します。
chmod +x consoleconsoleを実行してUserDBにアクセスします。
% ./console
 >> User.create(:nickname => 'Charlie', :email => 'charlie@abc.com')
 => #<User @id=1 @nickname="Charlie" @email="charlie@abc.com">
 >> User.create(:nickname => 'Tommy', :email => 'tommy@abc.com')
 => #<User @id=2 @nickname="Tommy" @email="tommy@abc.com">
 >> User.all
 => [#<User @id=1 @nickname="Charlie" @email="charlie@abc.com">, #<User @id=2 @nickname="Tommy" @email="tommy@abc.com">]
 >> User.first.nickname
 => "Charlie"
セッション
irb上でirbコマンドを使うことで、別のセッションを立上げることができます。
irb(main):009:0> irb
 irb#1(main):001:0> 1 + 2
 => 3
プロンプトの#番号が目印です。
mainのコンテキストで定義したメソッドは、Objectクラスのprivateインスタンスメソッドですから、どこからでも呼ぶことができます。
irb(main):025:0> Object.private_instance_methods(false).grep(/^f/)
 => [:fib]

 irb(main):007:0> irb
 irb#1(main):001:0> fib 10
 => 55
しかしセッションはローカル変数を共有しません。
irb(main):001:0> @a = 1
 => 1
 irb(main):002:0> b = 2
 => 2
 irb(main):003:0> irb
 irb#1(main):001:0> @a
 => 1
 irb#1(main):002:0> b
 NameError: undefined local variable or method `b' for main:Object from (irb#1):2
irbコマンドに任意のコンテキストを渡せば、そのコンテキストでセッションが立ち上がります。
irb(main):011:0> irb String
 irb#2(String):001:0> def too_long?
 irb#2(String):002:1>   self.size > 10 ? 'Yes, Too Long!!' : 'No problem.'
 irb#2(String):003:1> end
 => nil
 irb#2(String):004:1> exit
 irb(main):012:0> "Hello, Ruby World!!".too_long?
 => "Yes, Too Long!!"
 irb(main):013:0> "hi, ruby".too_long?
 => "No problem."
 irb(main):014:0>
セッションの一覧はjobs、切換えはfgコマンドで行います。
irb#2(String):004:0> jobs
 => #0->irb on main (#<Thread:0x0bfa68>: stop)
 #1->irb#1 on main (#<Thread:0x09c57c>: stop)
 #2->irb#2 on String (#<Thread:0x5d41e8>: running)
 irb#2(String):005:0> fg 0
 => #<IRB::Irb: @context=#<IRB::Context:0x3df2fc>, @signal_status=:IN_EVAL, @scanner=#<RubyLex:0x3e5cd8>>
 irb(main):015:0>
セッションの終了はexitまたは、kill [セッション番号]で行います。
Workspace
コンテキストを共有するworkspaceというものもあります。pushb(現在のbindingをpushする)コマンドで、別のworkspaceに移動します。
irb(main):011:0> str = "hello, ruby"
 => "hello, ruby"
 irb(main):012:0> pushb str
 => [main]
 irb(hello, ruby):013:0> reverse!
 => "ybur ,olleh"
そしてpopb(bindingをpop)で元のworkspaceに戻ります。popによって今いたworkspaceはなくなります。
irb(ybur ,olleh):014:0> popb
 => []
 irb(main):015:0> str
 => "ybur ,olleh"
セッションと異なり別のworkspaceに移るときには、新たなコンテキストを常に引数として渡す必要があります。プロンプトの表示がworkspaceでも目印になります。
workspaceでは外側のローカル変数を共有します1。
irb(main):016:0> str2 = " world!!"
 => " world!!"
 irb(main):017:0> pushb str
 => [main]
 irb(ybur ,olleh):018:0> str2
 => " world!!"
 irb(ybur ,olleh):019:0> concat str2
 => "ybur ,olleh world!!"
 irb(ybur ,olleh world!!):020:0> popb
 => []
 irb(main):021:0> str
 => "ybur ,olleh world!!"
workspaceはスタックになっているので、セッションのようにジャンプして移動することができません。workspaceの使い道はよくわかりません。
HELP
Ruby Reference Manualを読みたいのならhelpします。空リターンで終了です。
irb(main):008:0> help

 Enter the method name you want to look up.
 You can use tab to autocomplete.
 Enter a blank line to exit.

 >> String#reverse
 String#reverse

 (from ruby core)
 ---------------------------------------------
   str.reverse   -> new_str
 ---------------------------------------------
 Returns a new string with the characters from str in reverse order.

   "stressed".reverse   #=> "desserts"

 >> Array#join
 Array#join

 (from ruby core)
 ---------------------------------------------
   ary.join(sep=$,)    -> str
 ---------------------------------------------
 Returns a string created by converting each element of the array to a string,
 separated by sep.

   [ "a", "b", "c" ].join        #=> "abc"
   [ "a", "b", "c" ].join("-")   #=> "a-b-c"

 >>
 => nil
 irb(main):009:0>
.irbrcによるカスタマイズ
ホームディレクトリに配置した.irbrcに、設定を記述してIRBをカスタマイズできます。
require "irb/completion"これでタブ補完が効くようになります。
require "irb/ext/save-history"
 IRB.conf[:SAVE_HISTORY] = 1000
これで入力コマンドの履歴が1000件分保存されます。保存先はデフォルトでホームディレクトリの.irb_historyです。Ctrl+P Ctrl+N で履歴を辿ります。
IRB.conf[:EVAL_HISTORY] = 100これで実行結果の履歴を100件分覚えます。
__(アンダースコア2つ)で一覧し、__[line_no]で取り出します。
irb(main):001:0> 1 + 2
 => 3
 irb(main):002:0> _ * 4
 => 12
 irb(main):003:0> _ / 3
 => 4
 irb(main):004:0> __  <-- 結果の一覧表示
 => 1 3
 2 12
 3 4
 irb(main):005:0> x = __[2]  <---結果の取り出し
 => 12
 irb(main):006:0> x
=> 12IRB.conf[:AUTO_INDENT] = trueこれで構文に沿った自動インデントを可能にします。
irb(main):001:0> def foo
 irb(main):002:1>   :foo
 irb(main):003:1>   end
 => nil
 irb(main):004:0>
残念ながらendまではうまく処理できません。
プロンプトを変えたいなら、以下のようにします。
IRB.conf[:PROMPT][:MY_PROMPT] = {
   :PROMPT_I => "%N(%m)>> ",     # 通常時
   :PROMPT_N => "|  ",           # インデント時
   :PROMPT_C => ".> ",           # 式継続時
   :PROMPT_S => "%l> ",          # 文字継続行
   :RETURN   => "=> %s \n"       # リターン時
 }

 IRB.conf[:PROMPT_MODE] = :MY_PROMPT
%N %m %lはそれぞれ、設定したirb名、コンテキスト、セパレータを表します。
セッションごとにプロンプトを変えたいときは、IRB.conf[:IRB_RC]をセットします。
例えば以下を.irbrcに追加します。
IRB.conf[:IRB_RC] = lambda do |conf|
   if conf.irb_name[/\d+/]
     context = "%m(##{$&})"
     puts "-- You are in #{conf.main} --"
   end
   conf.prompt_i = "#{context}>> "
 end
以下のような表示になります。
>> :main => :main
 >> irb
 -- You are in main --
 main(#1)>> :main1 => :main1
 main(#1)>> irb Array
 -- You are in Array --
 Array(#2)>> :array => :array
 Array(#2)>>
mainでは»のみを表示し、サブセッションではコンテキスト名とセッション番号を表示します。サブセッションに入るときコンテキスト名をputsします。
.irbrcはRubyのコードとしてirbに読み込まれますから、ここにメソッドなどを定義すれば、トップレベルのメソッドとして使えます。
def now
   puts Time.now.strftime("%Y/%m/%d(%a) %H:%M:%S")
 end
>> now #=> nil
2010/11/16(Tue) 16:52:42プロンプトを動的に変えたいときは、以下のようにします。
>> conf.prompt_i = "><<<<@> " #=> "><<<<@> "
 ><<<<@> 1 + 2 #=> 3
 ><<<<@>
 ><<<<@> conf.prompt_mode = :DEFAULT #=> :DEFAULT
irb(main):011:0> 3 * 4 #=> 12
irb(main):012:0>
しかし.irbrcにメソッドを定義すればもっと便利になります。
def prompt(type='')
   prmt = [:DEFAULT, :SIMPLE, :IRBTOOLS, :KEYES]
   case type.to_s
   when /^def/i then conf.prompt_mode = prmt[0]
   when /^sim/i then conf.prompt_mode = prmt[1]
   when /^irbt/i then conf.prompt_mode = prmt[2]
   when /^key/i then conf.prompt_mode = prmt[3]
   when /^$/ then conf.prompt_mode
   else STDERR.puts "give one of them: #{prmt.map(&:inspect).join(" ")}"
   end
 end
IRB on Ruby1.9.2
>> prompt #=> :IRBTOOLS
>> prompt :defo #=> :DEFAULT
irb(main):003:0> prompt :SIMPLE #=> :SIMPLE
>> prompt :new #=> nil
give one of them: :DEFAULT :SIMPLE :IRBTOOLS :KEYES
>>.irbrcはirb起動時に自動で読み込まれますがfオプションでこれを無視できます。
irb -f拡張ライブラリ
irbを拡張する複数のライブラリがあります。しかしここでは最強の1つのライブラリを紹介します。それはirbtoolsライブラリです。
irbtoolsライブラリ
irbtoolsはirbの主要拡張ライブラリを統合し、さらに細かい多数の機能を追加したライブラリです。gem install irbtoolsでインストールし、.irbrcでrequire 'irbtools'することで使えるようになります。
irbtoolsには以下のライブラリが統合されています。
wirble fancy_irb fileutils coderay clipboard zucker ap yaml g guessmethod interactive_editor sketches boson hirb
特定のライブラリを外したい場合は.irbrcを以下のようにします。
#require 'irbtools'
 require "irbtools/configure"

 Irbtools.libraries -= %w(fileutils hirb)
 Irbtools.start
色付けとロケットプロンプト
irbtoolsをrequireしてirbを起動すると、Ruby情報を含むwelcomeメッセージのあとシンプルなプロンプトが現れます。戻り値はスペースが許す場合入力行の右に色付けされて出力されます。
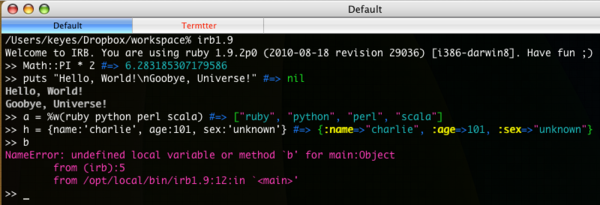
返り値が色付けされて右に来ることで、出力も見やすくなります。この機能はwirbleとfancy_irbライブラリによって実現されています2。
多様な出力形式
irbtoolsは多様な出力形式をサポートします。
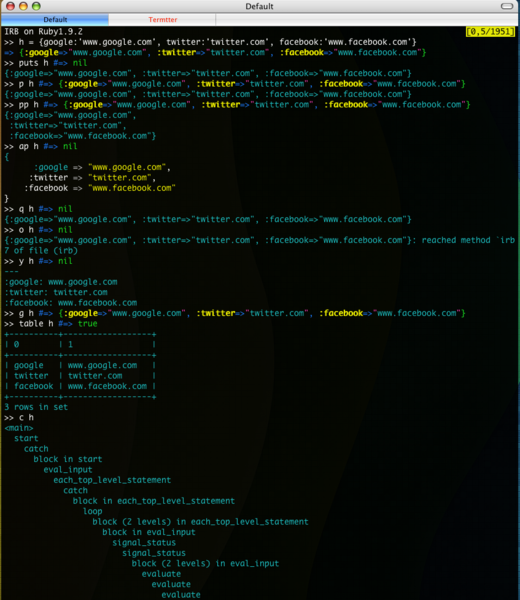
oは現在の行、ファイル、メソッドを、cはコールスタックを出力します。yはyaml形式、gはgrowlへの出力をします。tableはデータを表形式で出力します。これらの出力形式はawesome_print, zucker/debug, yaml、g、hirbなどのライブラリによって実現されています。
コマンド群
irbtoolsによって便利なコマンド群が用意されています。まずls, cat, mkdir, rm, touchその他のファイルユーティリティコマンドがあります。
>> ls
 => ["console", "iphone", "irbtools.txt", "lisr", "lorem.txt", "math.rb", "twilog.txt", "uni.rb", "unicode.txt", "user.db", "user.rb"]
 >> s = cat "lorem.txt"
 => "Lorem ipsum dolor sit amet, consectetur adipisicing elit, sed do eiusmod tempor incididunt ut labore et dolore magna aliqua. Ut enim ad minim veniam, quis..."
 >> pwd #=> "/Users/keyes/Dropbox/workspace"
 >>
Rubyファイルを表示する場合はCodeRayによるrayコマンドがいいです。引数で渡されたファイルがSyntax Highlightで表示されます3。
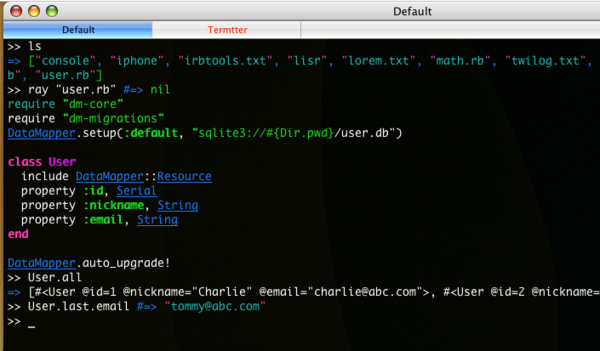
もっともCodeRayは本来HTMLを生成するものですから、その例を示したほうがいいですね。
user.rbを読み込んでhtmlを生成します。
>> user_html = CodeRay.scan(cat("user.rb"), :ruby).page
 => "<!DOCTYPE html PUBLIC "-//W3C//DTD XHTML 1.0 Strict//EN"\n  "http://www.w3.org/TR/xhtml1/DTD/xhtml1-strict.dtd">\n...
結果をuser.htmlファイルに書き込みます。
>> File.open('user.html','w') {|f| f.write user_html } #=> 6366ブラウザで見てみます。
>> system('open', 'user.html') #=> true
 >>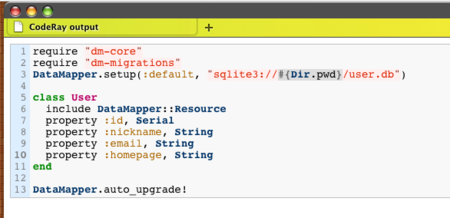
いいですね。
クリップボードとやり取りするためのcopy, paste, copy_inputがあります。copy_inputはirbの全セッションをコピーします。
>> site = paste #=> "http://d.hatena.ne.jp/keyesberry/"
 >> copy Math::PI #=> "3.141592653589793"
 >> copy_input  #=> "The session input history has been copied to the clipboard."
 >>
requireとloadのショートカットrqとld、requireし直すrerequireがあります。
>> rq:mathn #=> true
 >> rq:'open-uri' #=> true
 >> ld:json #=> true
入力履歴を出力するsession_history、irbにログインし直すreset!、画面をフラッシュするclearがあります。
>> Math::PI #=> 3.141592653589793
 >> puts 'helo' #=> nil
 helo
 >> 1 + 3 #=> 4
 >> %w(apple grape orange) #=> ["apple", "grape", "orange"]
 >> session_history 4 #=> "puts 'helo'\n1 + 3\n%w(apple grape orange)"
 >> reset!
 IRB on Ruby1.9.2
 >> clear
OSやRubyのバージョンを調べる、OS RubyEngine RubyVersionがあります。
>> OS #=> darwin8
 >> RubyEngine  #=> mri
 >> RE #=> mri
 >> RubyVersion  #=> 1.9.2
 >> RV #=> 1.9.2
 >>
 >> OS.windows? #=> false
 >> OS.linux? #=> false
 >> OS.mac? #=> true
 >> RE.jruby? #=> false
 >> RE.rubinius? #=> false
これらの機能はzucker Clipboardライブラリで実現されます。
エディタ支援
irbからエディタを呼び出し、そこで編集した内容をirb上に返す機能があります。vi, vim, emacs, mate, ed4などのコマンドでエディタが起動し一時ファイルを開きます。編集後エディタを閉じればirb内でそのコードを利用できます。
同じセッションで同じコマンドを使えば、同じ一時ファイルが開いて再編集ができるようになります。コマンドに特定のファイルを渡すこともできます。これはInteractive_editorライブラリにより実現されています。
同じような目的でSketchesライブラリがあります。こちらはエディタを閉じることなく、内容をirbに反映させることができます。
.irbrcでsketchesで使用するエディタをセットします。
Sketches.config :editor => 'mate', :background => true上記設定をしない場合は、環境変数$EDITORが参照されます。
skecthコマンドで指定エディタが起動します。エディタを閉じずに内容を保存します。これでirbにコードが反映されます。名前付きスケッチも作れます。sketchesでスケッチの一覧を表示します。save_sketchでスケッチをファイルに保存することもできます。
IRB on Ruby1.9.2
 >> sketch #=> nil
 >> fact 20 #=> 2432902008176640000
 >> sketch :fib #=> nil
 >> fib 20 #=> 6765
 >> sketches #=> nil
 #1

   def fact(n)
     (1..n).inject(:*)
   end  ...
 #2: fib
   def fib(n)
     [0,1].include?(n) ? n : fib(n-1) + fib(n-2)
   end
   ...
 >> name_sketch 1, :fact #=> nil
 >> save_sketch :fib, "fib.rb" #=> nil
 >>
コマンドの登録
bosonライブラリを使うことによって、効率的にコマンドを登録管理できます。どんなbosonコマンドがあるか確認するには、commandsコマンドを使います。
>> commands  #=> true
+--------------+----------+--------+------------+
| full_name    | lib      | usage  | description|
+--------------+----------+--------+------------+
| render       | core     | [object| Render any |
| menu         | core     | [arr] [| Provide a m|
| usage        | core     | [comman| Print a com|
| commands     | core     | [query=| List or sea|
| libraries    | core     | [query=| List or sea|
| load_library | core     | [librar| Load a libr|
| get          | web_core | [url] [| Gets the bo|
| post         | web_core | [url] [| Posts to a |
| build_url    | web_core | [url] [| Builds a ur|
| browser      | web_core | [*urls]| Opens urls |
| install      | web_core | [url][-| Installs a |
+--------------+----------+--------+------------+
11 rows in set
>>テーブルはターミナルの幅に合わせてtruncateされます5。
irbではそのままコマンドを使えます。
>> site = get "http://d.hatena.ne.jp/"
 => "<!DOCTYPE HTML PUBLIC "-//W3C//DTD HTML 4.01 Transitional//EN">\r\n<html>\r\n<head>\r\n<meta http-equiv="Content-Type" content="text/html; charset=euc-jp">\n<meta http-equiv="Content-Style-Type"
独自のコマンドを追加してみましょう。bosonのインストールでできた~/.boson/commandsディレクトリに、以下のようなRubyモジュールを作ります。
vi .boson/commands/mymath.rbmodule MyMath
#calculate fibonacci
def fib(n)
n = Integer(n)
[0, 1].include?(n) ? n : fib(n-1) + fib(n-2)
rescue
only_positive_error_msg
end
#calculate factorial
def fact(n)
n = Integer(n)
raise if n <= 0
n == 1 ? 1 : n * fact(n-1)
rescue
only_positive_error_msg
end
private
def only_positive_error_msg
STDERR.puts "Only accept POSITIVE integer!"
end
end再度コマンド一覧を見ます。
>> commands
+--------------+----------+--------+------------+
| full_name    | lib      | usage  | description|
+--------------+----------+--------+------------+
| render       | core     | [object| Render any |
| menu         | core     | [arr] [| Provide a m|
| usage        | core     | [comman| Print a com|
| commands     | core     | [query=| List or sea|
| libraries    | core     | [query=| List or sea|
| load_library | core     | [librar| Load a libr|
| get          | web_core | [url] [| Gets the bo|
| post         | web_core | [url] [| Posts to a |
| build_url    | web_core | [url] [| Builds a ur|
| browser      | web_core | [*urls]| Opens urls |
| install      | web_core | [url][-| Installs a |
| fib          | mymath   | [n]    | calculate f|
| fact         | mymath   | [n]    | calculate f|
+--------------+----------+--------+------------+
13 rows in set
>>
mymathライブラリの2つのコマンドが追加されています。
実行してみましょう。
>> fib 10 #=> 55
 >> fact 15 #=> 1307674368000
 >> fib :hello #=> nil
 Only accept POSITIVE integer!
 >> fact 'hi' #=> nil
 Only accept POSITIVE integer!
 >>
bosonの優れたところは、これらのコマンドをShellでも使える点にあります。shellではbosonを前置してコマンドを実行します。
>> exit
 % boson fib 10
 55
 % boson fact 15
 1307674368000
 % boson fib :hello
 Only accept POSITIVE integer!
 % boson fact 'hi'
 Only accept POSITIVE integer!
 %
テーブル/ツリー出力
先にも書きましたがtableコマンドはデータを表形式で出力します。これはデータベースと共に使うと更に便利です。先に出てきたUserDBにhomepageのpropertyを追加して表示します。
IRB on Ruby1.9.2
 >> rq:user #=> true
 >> User.all
 => [#<User @id=1 @nickname="Charlie" @email="charlie@abc.com" @homepage="http://www.nintendo.com">, #<User @id=2 @nickname="Tommy" @email="tommy@abc.com" @homepage="http://twitter.com/merborne/">, #<User @id=3 @nickname="Alice" @email="alice@xyz.com" @homepage="http://d.hatena.ne.jp/keyesberry/">]
これをtable表示します。
>> table User.all #=> true
 ----+----------+-----------------+----------------+
| id | nickname | email           | homepage       |
 ----+----------+-----------------+----------------+
| 1  | Charlie  | charlie@abc.com | http://www.nin |
| 2  | Tommy    | tommy@abc.com   | http://twitter |
| 3  | Alice    | alice@xyz.com   | http://d.haten |
 ----+----------+-----------------+----------------+
3 rows in set
条件で絞り込みます。
>> table User.all(:email.like=>"%@abc.com") #=> true
 +----+----------+-----------------+---------------+
 | id | nickname | email           | homepage      |
 +----+----------+-----------------+---------------+
 | 1  | Charlie  | charlie@abc.com | http://www.nin|
 | 2  | Tommy    | tommy@abc.com   | http://twitter|
 +----+----------+-----------------+---------------+
 2 rows in set
 >>
menuというコマンドを使うと表から値を抽出できます。以下の例ではTommyとAliceのhomepageを抽出して、それをbrowserコマンドに渡して開いています。
>> choices = menu User.all, :fields=>[:nickname, :homepage], :two_d=>true
 +--------+----------+----------------------------+
 | number | nickname | homepage                   |
 +--------+----------+----------------------------+
 | 1      | Charlie  | http://www.nintendo.com    |
 | 2      | Tommy    | http://twitter.com/merborn |
 | 3      | Alice    | http://d.hatena.ne.jp/keye |
 +--------+----------+----------------------------+
 3 rows in set
 Specify individual choices (4,7), range of choices (1-3) or all choices (*).
 Default field: nickname
 Choose: 2,3:h
 => ["http://twitter.com/merborne/", "http://d.hatena.ne.jp/keyesberry/"]
 >> browser *choices #=> true
 >>
ツリー表示を実現するviewというコマンドもあります。Rubyのクラスツリーを作ってみます。
>> class_tree = [[0,:Object],[1,:Array],[1,:Binding],[1,:Continuation],[1,:Data],[1,:Dir],[1,:Hash],[1,:IO],[2,:File],[2,:BasicSocket],[3,:IPSocket],[3,:UNIXSocket],[3,:Socket],[4,:TCPSocket],[4,:UDPSocket],[4,:UNIXServer],[5,:TCPServer],[1,:MatchData],[1,:Method],[1,:Module],[2,:Class],[1,:Numeric],[2,:Float],[2,:Integer],[3,:Bignum],[3,:Fixnum],[1,:Proc],[1,:Range],[1,:Regexp],[1,:String],[1,:Struct],[1,:Symbol],[1,:Thread],[1,:ThreadGroup],[1,:Time]]
 => [[0, :Object], [1, :Array], [1, :Binding], [1, :Continuation], [1, :Data], [1, :Dir], [1, :Hash], [1, :IO], [2, :File], [2, :BasicSocket], [3, :IPSocket], [3, :UNIXSocket], [3, :Socket], [4, :TCPSocket], [4, :UDPSocket], [4, :UNIXServer], [5, :TCPServer], [1, :MatchData], [1, :Method], [1, :Module], [2, :Class], [1, :Numeric], [2, :Float], [2, :Integer], [3, :Bignum], [3, :Fixnum], [1, :Proc], [1, :Range], [1, :Regexp], [1, :String], [1, :Struct], [1, :Symbol], [1, :Thread], [1, :ThreadGroup], [1, :Time]]
 >> view class_tree, :class=>:tree, :type=>:directory #=> true
 Object
 |-- Array|-- Binding|-- Continuation
 |-- Data
 |-- Dir
 |-- Hash
 |-- IO
 |   |-- File
 |   `-- BasicSocket
 |       |-- IPSocket
 |       |-- UNIXSocket
 |       `-- Socket
 |           |-- TCPSocket
 |           |-- UDPSocket
 |           `-- UNIXServer
 |               `-- TCPServer
 |-- MatchData
 |-- Method
 |-- Module
 |   `-- Class
 |-- Numeric
 |   |-- Float
 |   `-- Integer
 |       |-- Bignum
 |       `-- Fixnum
 |-- Proc
 |-- Range
 |-- Regexp
 |-- String
 |-- Struct
 |-- Symbol
 |-- Thread
 |-- ThreadGroup
 `-- Time
 >>
これらはHirbというライブラリで実現しますが、このライブラリは奥が深そうです。
Tagaholic - Ruby Class and Rails Plugin Trees With Hirb
irbtoolsにおける若干のカスタマイズ
プロンプトの形と出力の色は以下のようにしてカスタマイズできます。
#require 'irbtools'
 require "irbtools/configure"
 Irbtools.libraries -= %w(fancy_irb)
 Irbtools.start

 require "fancy_irb"
 FancyIrb.start(
  :rocket_prompt   => '><<<<@> ',
 # :result_prompt   => '=> ',
  :colorize => {
    :rocket_prompt => :yellow,
 #   :result_prompt => :blue,
 #   :input_prompt  => nil,
 #   :irb_errors    => :red,
 #   :stderr        => :light_red,
    :stdout        => :cyan,
 #   :input         => nil,
 #   :output        => true,
  }
)fancy_irbをirbtoolsから外し独立してrequireします。FancyIrb.startの引数に自分の設定を渡します6。
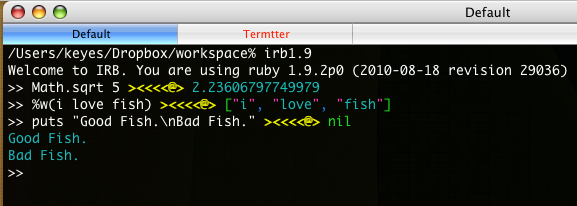
welcomeメッセージを変えることもできます。
#require 'irbtools'
 require "irbtools/configure"
 Irbtools.welcome_message = "IRB on Ruby#{ RUBY_VERSION }"
 Irbtools.start
irbtoolsライブラリを入れることで、irbはかなり強力なものになります。是非とも試してみてください。
非常に長くなりました。最後までお付き合いありがとうございます!
参考URLs
irbtools / Release the power of irb! Pablotron: Wirble janlelis’s fancy_irb at master - GitHub CodeRay Ruby Zucker 8 michaeldv’s awesome_print at master - GitHub jugyo’s g at master - GitHub jberkel’s interactive_editor at master - GitHub Sketches - About Boson - Command Your Ruby Universe Hirb - Irb On The Good Stuff
(追記:2010-11-17) CodeRayのHTML出力について記述を追加しました。
(追記:2010-11-18) CodeRayの記述の間違いを修正しました。
(追記:2010-11-20) .irbrcへのメソッド定義についての記述を追加しました。
(参考):IRB Wikipedia
blog comments powered by Disqus
